

Building a roll wrapped tapered carbon fiber tube can feel like you’re wrangling shadows. But don’t stress—whether you’re hacking together a DIY carbon fiber tube in your garage or fine-tuning specs for a pro-grade project, there’s a path forward that doesn’t involve guesswork or wasted material. Here’s the lowdown, especially if you’re wrestling with the curvy stuff like a curved carbon fiber tube or slicing through it with that trusty pipe cutter.

Step 1: Choose the Right Carbon Fiber Prepreg or Dry Fabric
Start with quality material. Want flex? Look at a flexible carbon fiber tube layout. Need strength? High modulus fibers—yeah, like high modulus carbon fiber tube material—work wonders under stress. If you’re after heat resistance, go with high temperature carbon fiber tube fabrics. Use roll wraps for better directional strength. Skip sloppy weaves. Save those for decorative projects.
Step 2: Build a Tapered Mandrel
A tapered tube ain’t happening without a mandrel shaped right. Machine your taper carefully or snag a CNC-cut version if you’re low on time. Mandrels can be solid aluminum or dissolvable plastic, depending on your pull-out or dissolve-out plan. For sharp tapers, don’t cheap out. Go precision.
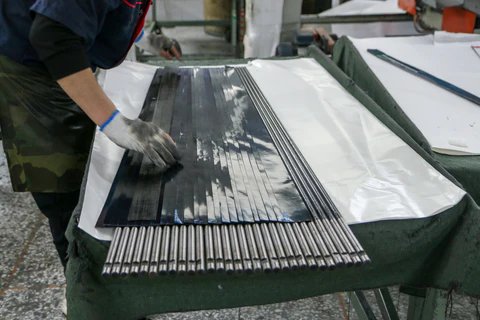
Step 3: Lay the Carbon Fiber by Hand or Wrap it on a Roller
Roll-wrapping means wrapping pre-cut sheets around the mandrel with overlapping angles. Tighter angles give hoop strength, shallow ones offer stiffness. Mind your layers. This matters if you’re mimicking dragonplate carbon fiber tubes or something like dragon carbon fiber tubes—they don’t fray because they’re layered like armor. Don’t forget to stagger your seams. You want smooth transitions, not bulges.

Step 4: Add Heat-Shrink Tape or Vacuum Bag
To consolidate layers and avoid bubbles, wrap the tube with heat-shrink tape. Or, use a vacuum bag setup if you’ve got one. Not perfect? You’ll get voids. Voids kill strength. Want a cleaner finish? Try peel-ply between your layup and shrink tape. You’ll thank yourself when sanding later.
Step 5: Cure it Properly
Curing can be tricky without an oven. But don’t half-bake it. Use a heat gun with a thermometer at minimum. Ideally, toss that sucker into a programmable oven. Temps matter. Some filament wound carbon fiber tubes cure at 250°F or higher. For strength? Follow the resin system’s curing guide exactly.
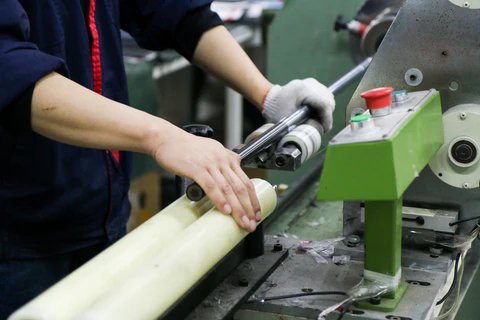
Step 6: Demold and Trim the Ends
Once cooled, pull that tube from the mandrel. Easy if you used mold release. Nightmarish if you didn’t. After that, slice the ends square. Use a fine-tooth blade or better yet, a cut carbon fiber tube with pipe cutter—cleaner cuts, fewer fibers sticking out.
Step 7: Drill, Cut, Modify
Need to trim or drill? Cool. Use carbide bits. When drilling carbon fiber tube material, slow speed works best. Let the drill do the work. Too fast and you’ll cook the epoxy. Slicing? Cutting carbon fiber steerer tube pieces or hex shapes? Mask the area and cut slow. Less fray, better edge.
Bonus Tips: Go Weird, Go Strong
Feeling bold? Try a forged carbon fiber tube look using scrap fibers and resin. Wild texture. Strong too. Need something geometric? You can fab a hexagonal carbon fiber tube with modular layup tricks and custom molds. Wanna go lighter or stiffer? Tweak your fiber orientation or double up with UD tapes.
Wrapping Up
Making a roll wrapped tapered carbon fiber tube demands prep, patience, and a touch of obsession. Want a pro finish? Avoid shortcuts. Whether you’re shaping a diy carbon fiber tube for a bike build or slicing a cut carbon fiber tube for robotics, it pays to work clean and slow. Keep your goals clear—flexible, rigid, heat-resistant—and match your fabric and method accordingly. For everything else? A good blade, clean workspace, and attention to layer angles get you 90% there.
Got questions? Cut your teeth on it. Trial and error beats theory every time.
References:
1. How To Cut Carbon Fiber Tubes: Key to Tolerance and Customer Relationships
2.How We Helped Our Client Solve Product Issues with Our Carbon Fiber Tubes?
3.Can Carbon Fiber Tubes Be Mass-Produced? Here’s What You Need to Know
4.How to Improve the Surface Quality of Large Diameter Carbon Fiber Tubes
5.Advantages of High Strength Carbon Fiber Tube for Automotive Manufacturing
One Response